It is pretty basic, but now that I know how each of these features work, the possibilities are huge!
Sunday, February 13, 2011
PE2_iMovie
Here's a little sample I've made that shows how I edited the text, font, text color, background and speed of the title slide transition.
It is pretty basic, but now that I know how each of these features work, the possibilities are huge!
It is pretty basic, but now that I know how each of these features work, the possibilities are huge!
PE1_iMovie
This week, my class is learning all about iMovie, one of the many fun products that come in Apple's iLife software suite. To help us truly understand the full scope of features that iMovie has to offer, our professor has assigned the iMovie 09 training series on Lynda.com.

The great thing about Lynda is that it gives you a detailed outline of the topics that will be covered, so that you can jump straight to the topics you need - or view them all from beginning to end, depending on your current needs.
One particular feature of iMovie that I have been eager to learn about is the application and customization of title slides. iMovie makes it really easy to drag and drop a template slide into your project, but I've found it a bit difficult to edit them to look exactly how I'd hoped.
In Chapter 5 of the iMovie series, there is a section on editing text properties. It has given me some great tips for saving time and further customizing my title slides.


Pretty cool stuff, huh?
Now, for all of you who are already well aquainted with these features, I challenge you to show me something new about editing text in iMovie that will undoubtedly blow my mind.
I can't wait to hear from you.

The great thing about Lynda is that it gives you a detailed outline of the topics that will be covered, so that you can jump straight to the topics you need - or view them all from beginning to end, depending on your current needs.
One particular feature of iMovie that I have been eager to learn about is the application and customization of title slides. iMovie makes it really easy to drag and drop a template slide into your project, but I've found it a bit difficult to edit them to look exactly how I'd hoped.
In Chapter 5 of the iMovie series, there is a section on editing text properties. It has given me some great tips for saving time and further customizing my title slides.

First, before you can begin, of course you need to select a title slide template.
To do this, look to the tool pane in the bottom-right corner of the screen.

Then click the "T" button to select the Text templates.

In the template window, select the template you'd like to add. Then, drag and drop it into position in your project.
Next, a box will immediately appear to ask you to change a background for your title slide. Pick a color - any color.

Now, once your template and background color are selected, you'll see a preview in the top-right panel.
And here comes the new exciting stuff...

Do you see the "Show Fonts" button in the top-left corner?
If you click that button, it will open a separate window with a world of font options available.

You can choose to select from nine pre-selected font styles and nine font sizes, as well as color, alignment and text features, such as bold and itallics.
To take it a step farther, you can click the System Font Panel button in the bottom-left. That will open the complete set of font and color options, as well as advanced text formatting, like letter and line spacing and much more.

Pretty cool stuff, huh?
Now, for all of you who are already well aquainted with these features, I challenge you to show me something new about editing text in iMovie that will undoubtedly blow my mind.
I can't wait to hear from you.
BP7_Wordle Commercial
Apparently, I love Wordle.net so much, I thought I'd work on a little free advertising campaign for them. (Ok, this is actually an assignment for school, but hey - whatever gets the word out, right?)
Please take a peek at my Wordle.net commercial to see some new tricks I've learned with iMovie. I hope you enjoy!
As always, your comments and suggestions are much appreciated. Please share!
Thursday, February 10, 2011
BP6_Zefty
Ok, one more cool find for the day... I can't help myself.
Another one of my classmates, Christine, found an awesome tool for helping kids to learn about money.
It allows you to create virtual checking accounts for your children or students. Kids can keep track of how much they have saved from their allowance or class reward system and then write "checks" to cash in their savings for real world rewards.
While this won't do much for me at work, I really look forward to showing this one to my daughter's second grade teacher.
I hope you'll visit Christine's blog and check out the cool tech tools she has found. I left a comment for Christine about Zefty and I'm sure she'd love to hear your thoughts, too.
Another one of my classmates, Christine, found an awesome tool for helping kids to learn about money.
 | |
| http://www.zefty.com/ |
While this won't do much for me at work, I really look forward to showing this one to my daughter's second grade teacher.
I hope you'll visit Christine's blog and check out the cool tech tools she has found. I left a comment for Christine about Zefty and I'm sure she'd love to hear your thoughts, too.
BP5_Glogster
My classmate Brigitte found a really neat tool called Glogster.
This tool allows you to work together as a class to create interactive posters. Teachers can create groups for each of their classes and have each student create a poster that reflects their understanding of a lesson. The best part is that you can add all kinds of media to these posters, including videos, music, photos, and more. If you want to take it offline, printing is an option, as well.
Check out Brigitte's blog for more info on Glogster and other neat tools. I've left a comment about her cool find and I'm sure she'd love to hear from you, too.
 |
| http://edu.glogster.com/ |
This tool allows you to work together as a class to create interactive posters. Teachers can create groups for each of their classes and have each student create a poster that reflects their understanding of a lesson. The best part is that you can add all kinds of media to these posters, including videos, music, photos, and more. If you want to take it offline, printing is an option, as well.
Check out Brigitte's blog for more info on Glogster and other neat tools. I've left a comment about her cool find and I'm sure she'd love to hear from you, too.
BP4_bubbl.us
When it comes to mind mapping (brainstorming) tools, I have been a loyal Mindjet follower for as long as I can remember. However, this week I was encouraged (via course assignment) to expand my horizons. So, with my sense of software loyalty tucked neatly in tow, I went on a hunt for (what I assumed would be) a watered-down alternative to my dear Mindjet.
Needless to say, I was a bit skeptical.
But alas, the Web never ceases to amaze me. Mindjet, I love you dearly, but I'm afraid that a sweet little free online tool has won my favor.
bubbl.us is almost too good to be true.
First, I'm always weary about having to sign-up for yet another online account for something that I may use infrequently, or abandon altogether if I'm not impressed. But get this, bubbl.us doesn't force you to register first! You can just click the "Start Brainstorming" button and you can start creating a map right away.
One click and begin. Awesome.

If you decide that you do want to save your maps (and you will, trust me) the registration process on bubbl.us is super simple. They don't make you fill out extensive forms about where you live and who your favorite teacher was in grade school. It is really just as simple as this:

On the mapping stage, it only takes one click to add new independent or child topics. They also offer simple hot keys, if you're not a point and click fan.

When you want to color code your bubbles, change text size, disconnect a bubble or delete one all together, just hover your cursor over the shape and a handy tool box pops up.

 So next, let's say you want to save your map. The great thing is that bubbl.us is set to auto-save every five minutes, by default. You have the option to turn off auto-save... but why?
 You also have the option of creating your own folder structure. Here again, the process is simple. You get one-click actions to create new folders and simple drag and drop functionality to move folders and files around.
But finally, the thing that truly made me fall in love with bubbl.us ... the output options. Of course, you can print.

Sure, you can create a .jpg or .png.
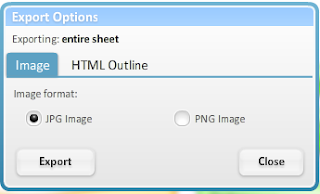
But wait! You can auto-generate an HTML widget to give full zoom and panning capabilities to anyone on your websites, blogs, wikis, what have you. This is too cool! Not only did it save me a huge amount of time, but again, it was so simple I felt like I was cheating. Guilty web pleasures for my inner geek - priceless.

Sure, bubbl.us doesn't offer a slew of fancy shapes or templates or kitchy icons, but what you lose in added features, you gain in overall ease of use. It is refreshingly simple to get started and the html output option is like techie gold.
For any of you who still aren't sold, here's the map that I created for class this week.
It is important to note that this map took one hour - including data entry - from start to finish. That includes finding bubbl.us , registering, and figuring out the tools.
If you have any thoughts about this or other tech tools, leave me a message! I'd love to review your favorite tools in a future post.
Needless to say, I was a bit skeptical.
But alas, the Web never ceases to amaze me. Mindjet, I love you dearly, but I'm afraid that a sweet little free online tool has won my favor.
bubbl.us is almost too good to be true.
First, I'm always weary about having to sign-up for yet another online account for something that I may use infrequently, or abandon altogether if I'm not impressed. But get this, bubbl.us doesn't force you to register first! You can just click the "Start Brainstorming" button and you can start creating a map right away.
One click and begin. Awesome.

If you decide that you do want to save your maps (and you will, trust me) the registration process on bubbl.us is super simple. They don't make you fill out extensive forms about where you live and who your favorite teacher was in grade school. It is really just as simple as this:

On the mapping stage, it only takes one click to add new independent or child topics. They also offer simple hot keys, if you're not a point and click fan.

When you want to color code your bubbles, change text size, disconnect a bubble or delete one all together, just hover your cursor over the shape and a handy tool box pops up.


But finally, the thing that truly made me fall in love with bubbl.us ... the output options. Of course, you can print.

Sure, you can create a .jpg or .png.

But wait! You can auto-generate an HTML widget to give full zoom and panning capabilities to anyone on your websites, blogs, wikis, what have you. This is too cool! Not only did it save me a huge amount of time, but again, it was so simple I felt like I was cheating. Guilty web pleasures for my inner geek - priceless.

Sure, bubbl.us doesn't offer a slew of fancy shapes or templates or kitchy icons, but what you lose in added features, you gain in overall ease of use. It is refreshingly simple to get started and the html output option is like techie gold.
For any of you who still aren't sold, here's the map that I created for class this week.
It is important to note that this map took one hour - including data entry - from start to finish. That includes finding bubbl.us , registering, and figuring out the tools.
If you have any thoughts about this or other tech tools, leave me a message! I'd love to review your favorite tools in a future post.
Wednesday, February 9, 2011
Facebook as a literary medium?
A dear friend of mine posted this link on Facebook and I can't go on with my day without sharing it with you all.
Jekyll-Hyde Facebook
This very clever take on the literary classic takes a whole new approach to the classic book report. It really goes to show that Web 2.0 is revolutionizing the way we share, view, interpret and ultimately re-define the world around us.
I hope you enjoy it as much as I do. Let me know what you think!
Subscribe to:
Posts (Atom)